COB LED strip is popular for one simple reason: it gives you a cleaner line of light.
No obvious dots. No broken-looking light line. Better for cabinets, shelves, coves, display lighting, and other visible linear applications. On Xmart’s COB range, common options include 12V, 24V, and 48V versions, multiple PCB widths, and typical cut lengths such as 25mm for 12V and 50mm for 24V systems.
But once the strip gets to site, the real questions usually start:
- Can COB LED strip be cut?
- Where exactly do you cut it?
- Can you reconnect it after cutting?
- Do you need soldering?
- What power supply should you use?
- What changes when the run gets longer?
Table of Contents
- What is COB LED strip?
- Step 1: Can you cut COB LED strip?
- Step 2: How to cut COB LED strip correctly
- Step 3: How to connect COB LED strip
- Step 4: Soldering vs connectors
- Step 5: How to power COB LED strip
- Step 6: What about longer runs?
- Quick setup examples
- Common mistakes to avoid
- FAQ
- Final checklist
What is COB LED strip?

COB LED strip is a flexible strip light designed to create a smoother and more continuous light line than standard dotted LED strip. Xmart’s COB product page positions it as a dotless linear lighting option for premium projects, with mono, tunable white, RGB, RGBW, RGB-SPI, and 48V versions available.
In simple terms, choose COB when:
- the strip will be visible
- you want a cleaner light line
- you want fewer hotspots
- the project needs a more premium look
Typical uses include furniture lighting, cabinet lighting, hotel projects, retail shelving, and architectural linear lighting.
If you want to compare actual product options first, start here: COB LED Strip
Step 1: Can you cut COB LED strip?
Yes, COB LED strip can usually be cut, but only at the marked cutting points.
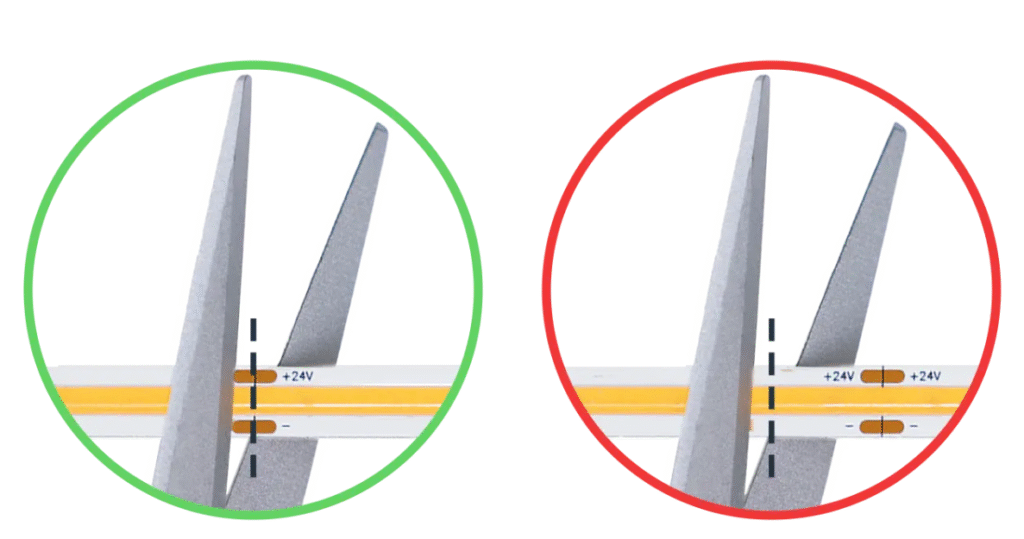
Xmart’s own COB page states that COB strips have clear cutting marks and gives standard examples of 50mm cut intervals for 24V systems and 25mm for 12V systems.
Other current LED strip installation references say the same thing: make sure the strip is designed to be cut, disconnect power first, and cut only at the marked line.
Before cutting, check these three things:
- strip voltage (usually 12V or 24V)
- cut mark
- whether the power is fully disconnected
Do not cut the strip while it is powered. That is unsafe and can also damage the strip.
Step 2: How to cut COB LED strip correctly
Cutting COB strip is simple, but it needs to be accurate.
Basic process
- Measure the required length
- Find the marked cut line
- Cut straight across the strip
- Test the cut section before final installation
That last step matters. Testing first helps catch a bad cut or loose contact before the strip is fixed into a profile, cabinet, or cove. Practical COB buying and installation guides also recommend checking the cut section before final mounting.
What tools should you use?
Keep it simple:
- sharp scissors or cutters
- connector or end cap, and related accessories
- a ruler if you want a straighter cut
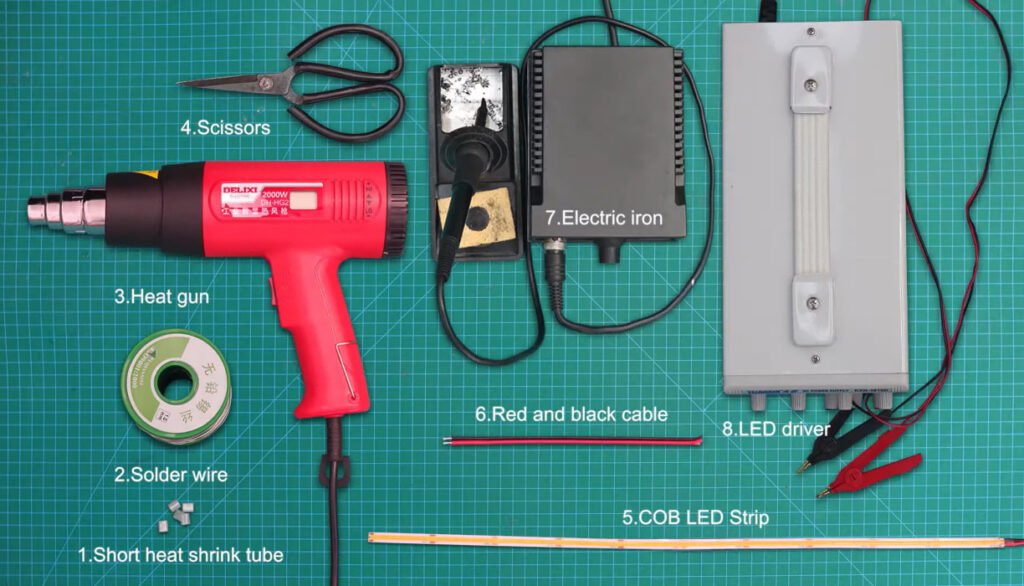
You do not need special workshop tools for normal projects. Current LED strip cutting guidance notes that regular scissors or a sharp blade can work, but the important part is cutting cleanly on the marked cut point without damaging the circuit.
Good cutting habits
- cut in the middle of the marked cut zone
- keep the cut straight
- do not crush the PCB
- do not bend the strip hard at the cut end
- test before sticking it down
If your project needs very short custom sections, do not assume every COB strip has the same cut length. Always check the actual product spec or the reel marking first. Xmart’s COB page already makes clear that 12V and 24V versions commonly use different cut intervals.
Step 3: How to connect COB LED strip
After cutting, there are two main ways to reconnect COB strip:
1. Soldering
2. Fast Connector
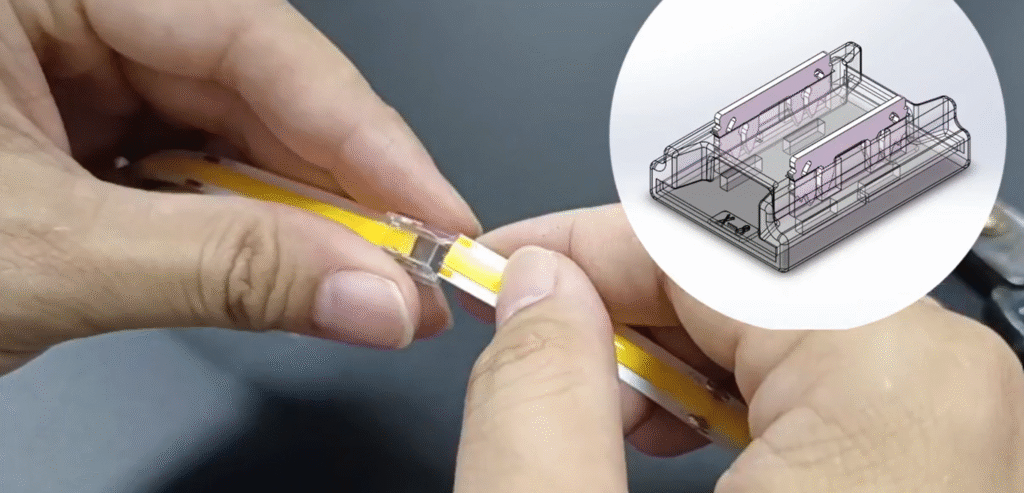
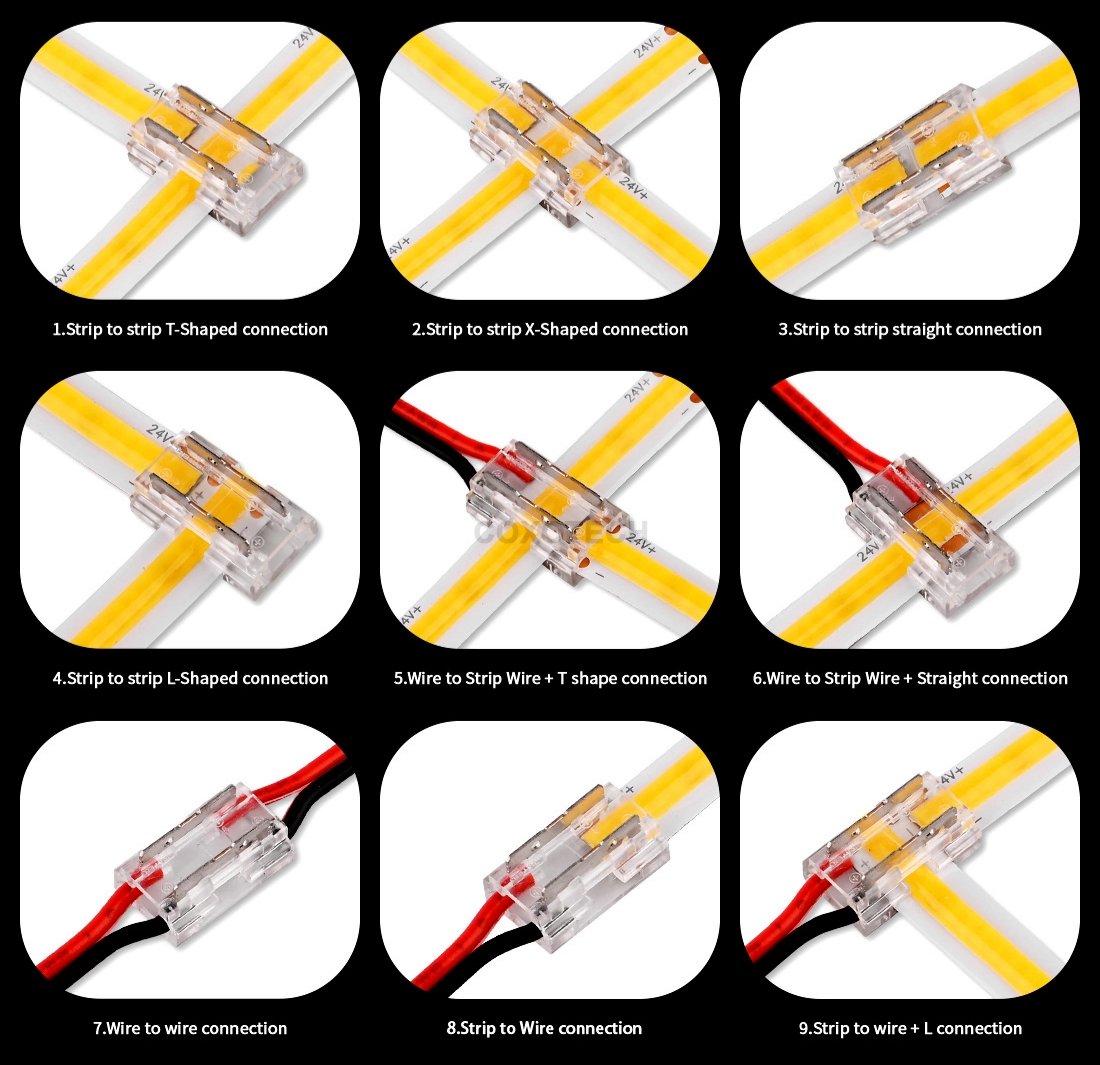
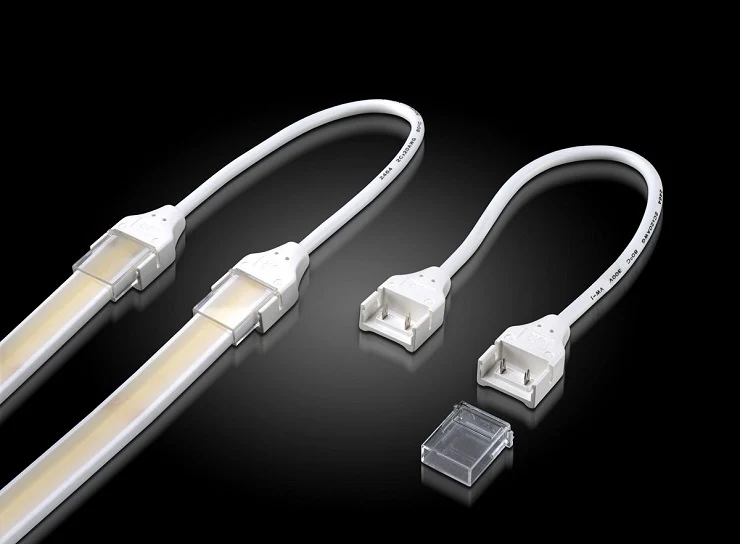
Xmart’s COB page shows multiple connector options, including fast connectors, cable connectors, middle connectors, and L-shape connectors, which is useful for cabinet sections, shelving gaps, or corner transitions.
Common connection types
1. Strip-to-strip
Use this when two cut sections continue in a straight line.
2. Strip-to-wire
Use this when the strip needs to connect to a power supply, controller, or extension cable.
3. Strip-to-strip with a cable gap
Use this when two lit sections are separated by a cabinet wall, shelf divider, drilled hole, or physical gap.
4. Corner connection
Use this when the installation changes direction and you do not want to bend the strip sharply at the corner.
Current LED strip connection guides also show connector-based methods for multiple segments and corners, with the same basic requirement: clean cut ends and good pad contact.
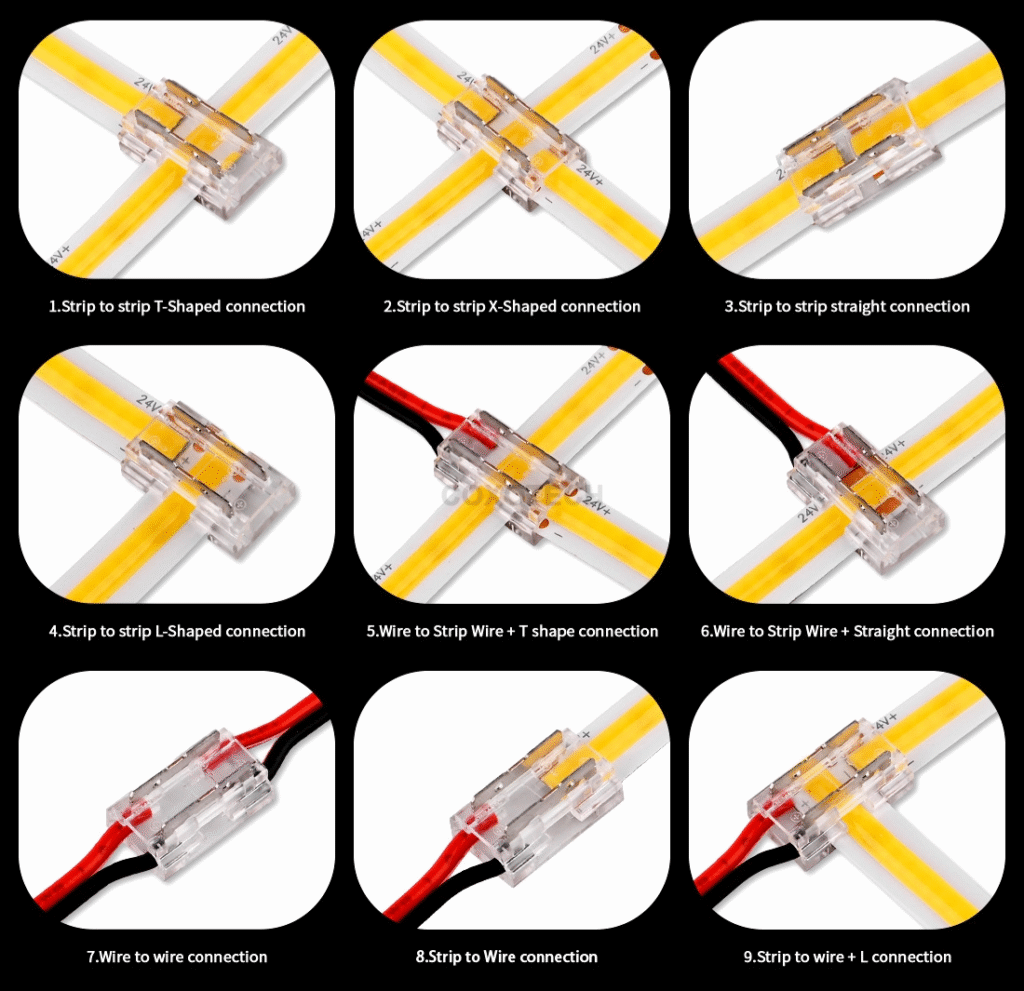
5. Waterproof Connector
One rule you cannot ignore: polarity
For single-color COB strip, positive must match positive and negative must match negative.
For tunable white, RGB, RGBW, or other multi-channel versions, make sure each channel label matches correctly. Wiring guides for LED strips stress this because reversed polarity or wrong channel mapping is one of the most common causes of connection failure.
For product reference, this is a good place to add your internal category links, such as: COB LED Strip
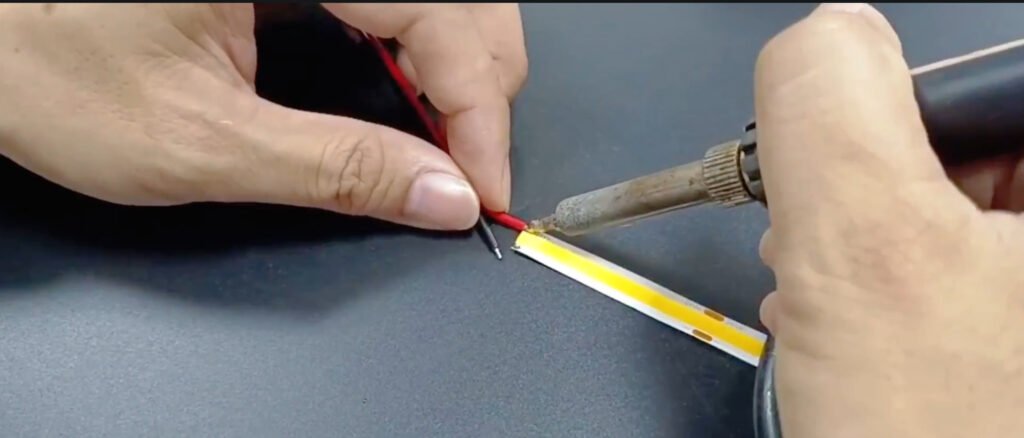
Step 4: Soldering vs connectors
There is no single answer here. It depends on the project.
Use soldering when:
- the installation is permanent
- vibration resistance matters
- you want the strongest electrical connection
- the connection will be hidden inside joinery or a profile
Xmart’s COB page calls soldering to exposed copper pads the most reliable and permanent method.
Use connectors when:
- installation speed matters
- on-site assembly needs to be easier
- you want a simpler field solution
- the installer does not want to solder on location
Connector-based methods are common in small and medium installations, especially where cabinets, shelves, or segmented runs need fast assembly. Practical LED strip connection guides also include solderless methods for this reason.
The simple tradeoff
Soldering is stronger.
Connectors are faster.
That is usually the real decision.
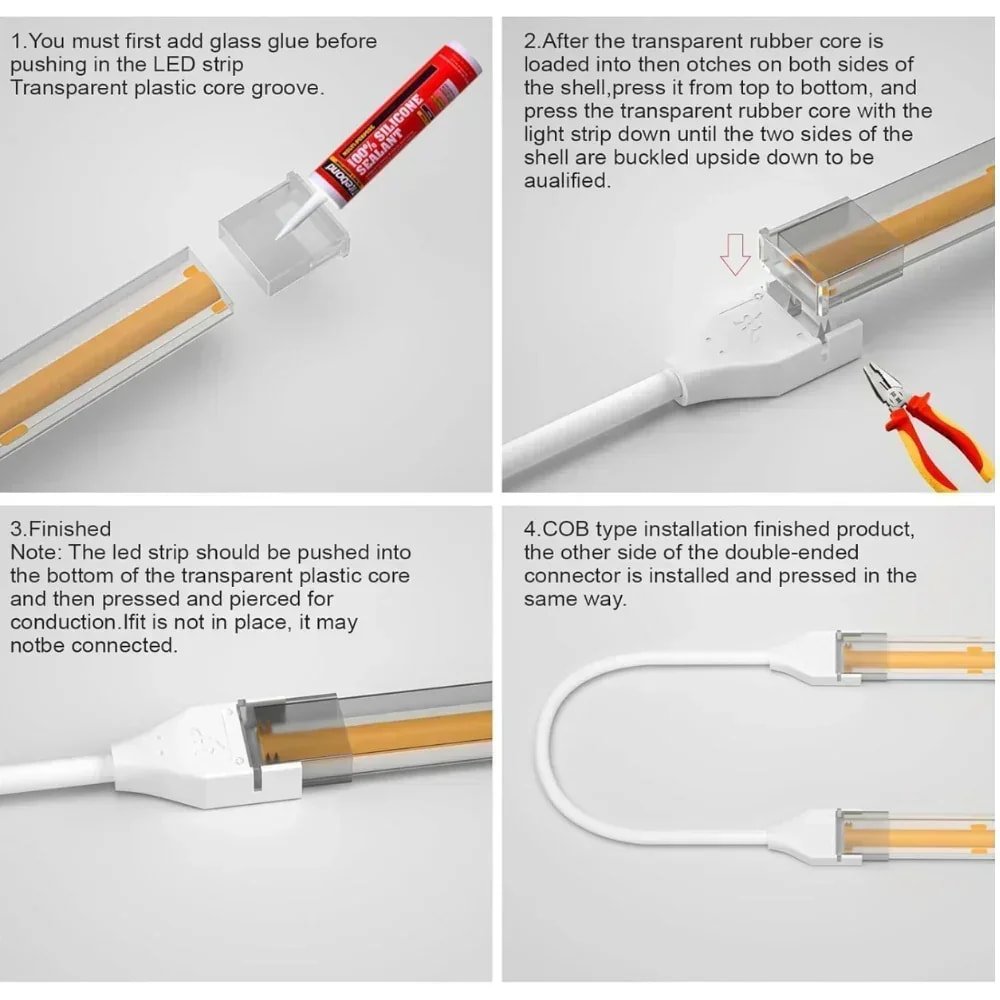
Important note for waterproof strip
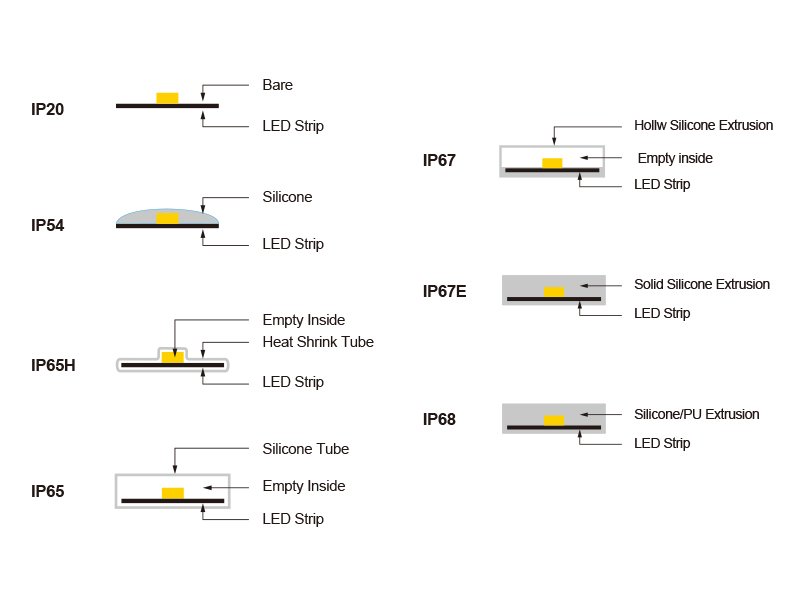
If the strip has waterproof coating, silicone, or filled construction, reconnection is more complicated. Standard dry-strip connectors may not fit, and the original sealing can be lost if the joint is not rebuilt correctly. This is one reason IP20 strips are much easier to cut and reconnect than waterproof outdoor versions.
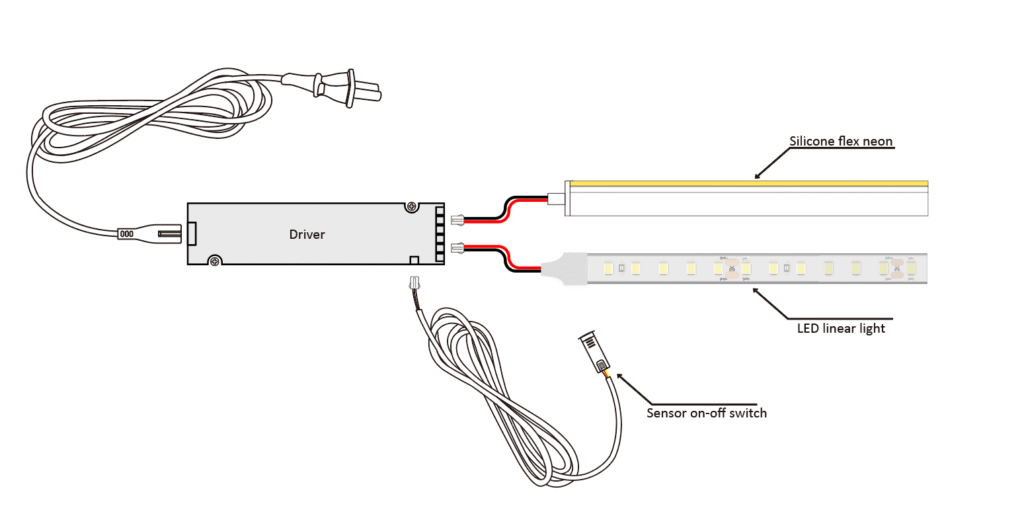
Step 5: How to power COB LED strip
This is where buyers make the most mistakes.
Rule 1: Voltage must match
If the strip is 12V, use a 12V constant-voltage power supply.
If the strip is 24V, use a 24V constant-voltage power supply.
If the strip is 36V or 48V, use the matching 36V or 48V constant-voltage supply.
Xmart’s ultra-long strip page is very clear on this point: its 24V, 36V, and 48V ultra-long strips use standard constant-voltage DC power supplies, with the strip’s IC handling current regulation.
Rule 2: Calculate total wattage correctly
Use this formula:
Total strip power = watts per meter × total length
Examples:
- 10W/m × 5m = 50W
- 12W/m × 8m = 96W
Rule 3: Leave headroom
Do not size the driver at exactly the same wattage as the strip load.
A practical rule is to leave at least 20% spare capacity so the power supply is not running at full load continuously. LED strip power-supply guides commonly recommend extra headroom for reliability and heat control.
Examples:
- 50W load → choose 60W or 75W
- 96W load → choose 120W
- 144W load → choose 180W, or split the load properly
Rule 4: Choose the right power-entry method
For smaller indoor projects, a plug-in adapter can be convenient.
For larger installations, waterproof setups, or more professional wiring layouts, open-wire constant-voltage power supplies are more common. LED strip power connection guides distinguish between these use cases for exactly that reason.
Step 6: What about longer runs?
COB strip may look smoother than standard dotted strip, but it still follows the same electrical rules.
Longer runs still bring voltage drop, brightness loss at the far end, and the need for better feed planning. LED strip wiring guides specifically call out voltage drop and parallel connection as key issues in longer installations.
What can happen on long runs?
If the run is too long for the strip design, you may see:
- brightness fading at the end
- uneven white tone
- lower overall output
- unstable performance
- overheated feed points or wiring
What should you do instead?
For longer runs, use one or more of these:
- higher voltage strip
- power injection
- parallel wiring
- multiple feed points
- long-run strip designed for bigger distances
Xmart’s long-run page gives a clear direction here. Its ultra-long series supports standard 24V, 36V, and 48V constant-voltage power supplies, and positions higher-voltage versions as better suited to long-distance runs.
If the project is much longer than a standard cabinet or shelf run, this is a better internal link to use:
36/48V Ultra Long LED Strip
For harsher long-run environments, Xmart also has dedicated project pages for tunnel, mining, and industrial routes, with 24V / 36V / 48V options and IP67 protection.
Quick setup examples
1. Under-cabinet kitchen lighting
A common setup:
- 24V COB strip
- cut to cabinet length
- strip-to-wire connector for separated cabinet sections
- 24V constant-voltage power supply
- test before final fixing
2. Shelf lighting with a visible gap
A common setup:
- cut two COB sections
- use a cable connector between them
- keep polarity correct
- hide the cable through the shelf or cabinet body
3. Long cove lighting with a smooth light line
A common setup:
- COB strip for dot-free appearance
- check whether the run fits a normal 24V layout
- if not, move to 36V or 48V long-run solution
- inject power or split feeds where needed
For these long cove projects, linking to your ultra-long strip page makes more sense than forcing a standard strip into a job it was not built for.
Common mistakes to avoid
- cutting between cut marks instead of on the cut line
- cutting while the strip is powered
- reversing polarity
- using the wrong voltage power supply
- choosing a driver with no spare wattage
- assuming all connectors fit all strip widths
- using dry connectors on waterproof strip without rebuilding the seal
- forcing a long run onto a strip that really needs power injection or higher voltage
These are the mistakes most likely to cause dead sections, flicker, uneven brightness, or early failure.
FAQ
Can you cut COB LED strip anywhere?
No. You should cut only at the marked cutting points. Xmart’s COB page and other current LED strip guides both make this clear.
Can you reconnect COB LED strip after cutting?
Yes. You can reconnect it by soldering or by using suitable connectors, depending on the strip type and the project.
Is soldering better than connectors?
Usually yes for permanence and reliability. Connectors are faster, but soldering is generally the stronger connection. Xmart’s COB page explicitly describes soldering as the most reliable and permanent method.
What power supply should I use for COB LED strip?
Use a constant-voltage DC power supply that matches the strip voltage, and leave extra wattage headroom. Xmart’s ultra-long page states this directly for its 24V, 36V, and 48V systems.
Does COB LED strip need power injection?
Sometimes, yes. On longer runs, voltage drop still matters. Wiring guides recommend planning for power injection, parallel connection, or higher-voltage solutions when the run gets longer.
Is COB better than standard dotted strip for visible applications?
In many cases, yes. COB is often chosen because the light line looks smoother and more continuous, especially in visible furniture, shelving, and architectural lighting. Xmart positions its COB range exactly around that value.
Final checklist
Before you cut, connect, or power any COB strip, confirm these points:
- strip voltage: 12V, 24V, 36V, or 48V
- strip width: 4mm, 8mm, 10mm, 12mm, or other
- cut mark location
- dry or waterproof construction
- connection method: solder or connector
- total run length
- driver wattage
- whether the run needs power injection or a higher-voltage solution
Need help matching the right COB strip?
Send these details:
- application
- required length
- strip width
- voltage
- whether you need straight join, wire gap, corner connection, or long-run feeding
We can then match the right COB strip, connector method, and power setup for the project.