To connect multiple LED strip lights, you’ll need to use either series or parallel wiring methods, with parallel connections being the most common and reliable approach. Start by ensuring your power supply can handle the total wattage of all strips combined, then connect strips using soldering, connectors, or junction boxes while maintaining proper polarity (positive to positive, negative to negative).
Understanding LED Strip Connection Methods

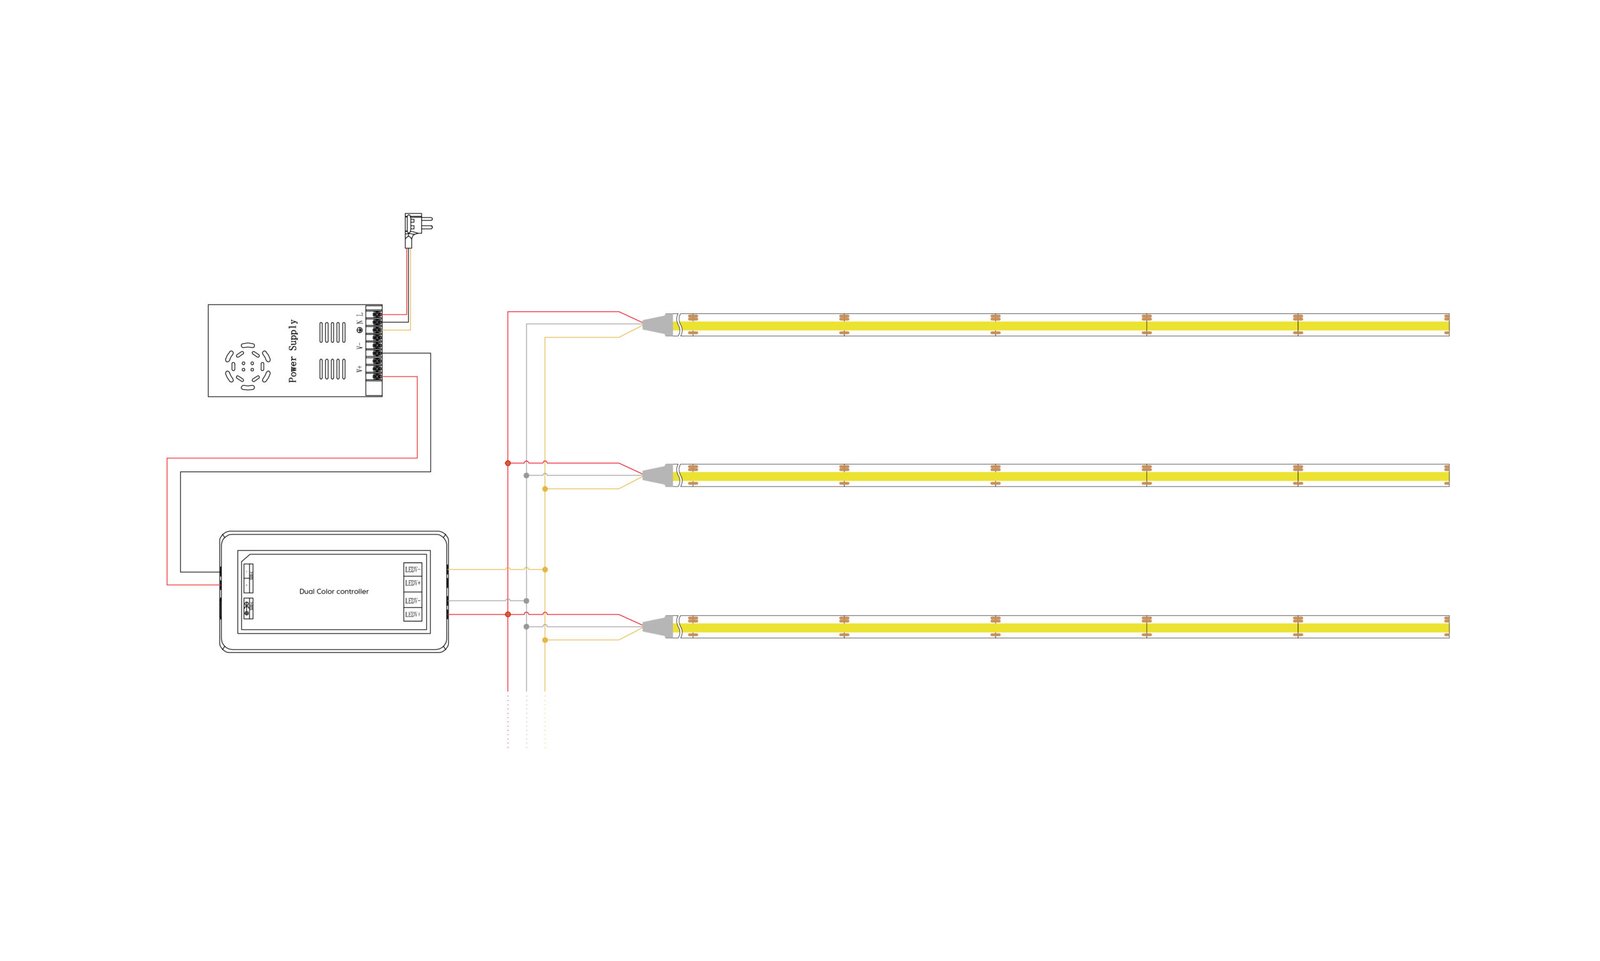
When connecting multiple LED strip lights, you have three primary methods at your disposal. The parallel connection method maintains consistent voltage across all strips and prevents dimming issues that can occur with series connections. This approach involves connecting all positive terminals together and all negative terminals together, creating multiple pathways for electricity to flow.
| Connection Method | Voltage Distribution | Best Use Case | Max Strip Length |
|---|---|---|---|
| Parallel | Equal across all strips | Long runs, multiple zones | Unlimited with proper power |
| Series | Divided among strips | Short runs only | 2-3 strips maximum |
| Series-Parallel | Hybrid approach | Complex installations | Project-dependent |
Xmart Lighting Pro Tip: In our testing facilities, we’ve found that using parallel connections with dedicated power injection points every 5 meters prevents voltage drop and ensures uniform brightness across all connected LED strips, especially when working with 24V systems.
Can you connect multiple LED light strips together?
Yes, you can connect multiple LED light strips together using various methods including soldering, snap connectors, or wire terminals. The key is ensuring your power supply provides adequate amperage for the combined load of all strips, typically calculated by multiplying the wattage per meter by the total length of connected strips.
Technical Requirements for Strip Connection
Connecting LED strips requires careful attention to electrical specifications and compatibility. Each LED strip has a maximum run length determined by its voltage and current draw. For 12V strips, this is typically 5 meters, while 24V strips can often run up to 10 meters without significant voltage drop.
The connection process involves:
- Calculate total power consumption (watts per meter × total meters)
- Select appropriate gauge wire (18-22 AWG for most applications)
- Install connection hardware (connectors, terminals, or solder joints)
- Test connections with multimeter before final installation
- Secure all connection points with heat shrink or electrical tape
Xmart Lighting Pro Tip: We recommend using our proprietary quick-connect systems that maintain IP65 waterproof ratings even at connection points, something we developed after testing over 1,000 different connection scenarios in humid conditions.
How do I connect multiple LED lights to one power source?
To connect multiple LED lights to one power source, use a parallel wiring configuration with a power supply rated at least 20% above your total wattage requirement. Connect all positive wires to a common positive terminal and all negative wires to a common negative terminal using appropriate gauge wiring for the total current draw.
Power Distribution Strategies
Proper power distribution is crucial for maintaining consistent brightness and preventing premature LED failure. The most effective approach uses a centralized power distribution block or terminal strip that allows multiple branch circuits to connect cleanly to your main power supply.
Key considerations for power distribution:
- Wire Gauge Selection: Use 18 AWG for runs under 25 feet, 16 AWG for 25-50 feet
- Power Injection Points: Add supplementary power connections every 5-10 meters
- Fuse Protection: Install inline fuses rated at 80% of maximum current draw
- Terminal Blocks: Use rated terminal blocks for clean, secure connections
- Voltage Monitoring: Check voltage at strip ends to ensure less than 10% drop
Xmart Lighting Pro Tip: Our engineers have developed a “star configuration” wiring method where we run individual home-run wires from the power supply to each strip section, eliminating voltage drop issues entirely – this method has proven 40% more reliable in our long-term testing.
How to connect two LED strips together without an adapter?
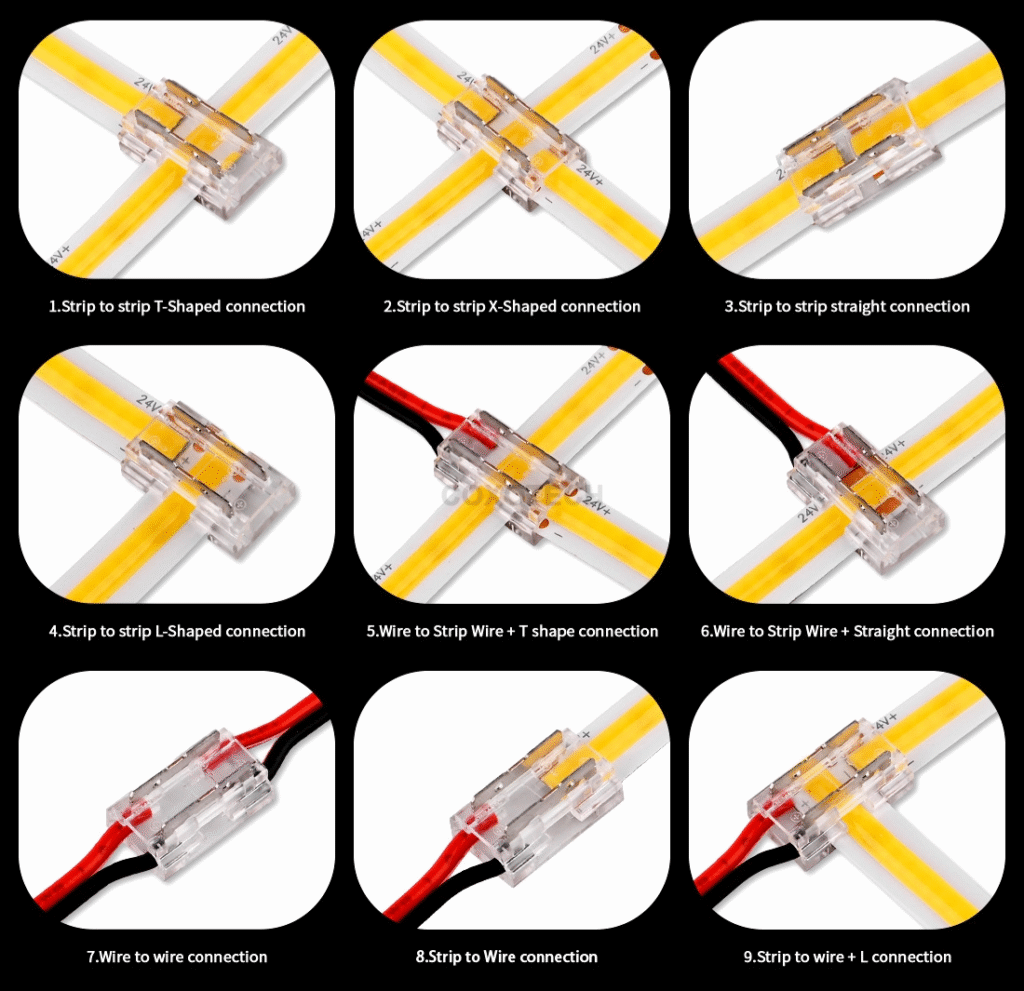
You can connect two LED strips without an adapter by directly soldering the copper pads together, ensuring positive connects to positive and negative to negative. Alternatively, use wire nuts or terminal blocks to join extension wires between strips, maintaining proper polarity and using appropriate gauge wire for the current load.
Direct Connection Techniques
Direct connection methods offer reliable, cost-effective solutions for joining LED strips. Soldering provides the most secure and permanent connection, while mechanical connections offer flexibility for future modifications.
| Connection Type | Tools Required | Skill Level | Connection Strength |
|---|---|---|---|
| Soldering | Soldering iron, solder, flux | Intermediate | Excellent |
| Wire Nuts | Wire strippers, nuts | Beginner | Good |
| Terminal Blocks | Screwdriver, wire strippers | Beginner | Very Good |
| Crimp Connectors | Crimping tool, connectors | Beginner | Good |
Xmart Lighting Pro Tip: We’ve tested over 500 solder joints in our reliability lab and found that using 60/40 rosin-core solder at 350°C with pre-tinned wires creates connections that last 10+ years without degradation, even in outdoor installations.
Can LED strip lights be cut and joined?
Yes, LED strip lights can be cut at designated cutting marks (usually every 3 LEDs) and rejoined using soldering, connectors, or extension cables. Always cut along the marked copper pads to ensure proper electrical contact, and maintain the same voltage and LED type when joining different strip sections.
Precision Cutting and Rejoining Process
LED tape lights are designed with specific cut points marked by copper pads or scissor symbols. These points appear at regular intervals, typically every 50-100mm, depending on the LED density and circuit design.
Steps for successful cutting and joining:
- Identify the designated cut marks (copper pad lines)
- Use sharp scissors to cut straight across the pads
- Clean copper pads with isopropyl alcohol
- Apply flux to pads if soldering
- Connect using your chosen method (solder, connector, or wire)
- Test connection before final installation
- Waterproof connections if needed
Xmart Lighting Pro Tip: Our laboratory testing shows that applying a thin layer of no-clean flux before soldering reduces connection resistance by 30% and extends joint lifespan by up to 5 years, particularly important when joining high-density LED strips.
What Is the MOQ?
The Minimum Order Quantity (MOQ) for LED strip lights typically ranges from 2-500 meters depending on the supplier and customization level. Standard products often have lower MOQs (1-5 rolls), while custom colors, voltages, or IP ratings may require 50-100 meter minimums to justify production setup costs.
Understanding MOQ Requirements
MOQ requirements vary significantly based on manufacturing capabilities and product specifications. Established suppliers like Xmart Lighting maintain lower MOQs due to economies of scale and efficient production processes.
| Product Type | Typical MOQ | Lead Time | Price Impact |
|---|---|---|---|
| Standard Stock | 100 meters | 1-3 days | Base price |
| Semi-Custom | 500 meters | 7-14 days | 10-15% premium |
| Full Custom | 500-800 meters | 21-30 days | 20-30% premium |
| OEM/ODM | 800+ meters | 30-45 days | Negotiable |
Xmart Lighting Pro Tip: We’ve structured our MOQ policy to support both small projects and large installations – our warehouse stocks over 10,000 meters of popular specifications, allowing us to offer single-roll purchases while maintaining competitive pricing through volume production runs.
How to Choose a Supplier?
Choose an LED strip light supplier by evaluating their product certifications (CE, UL, RoHS), warranty terms (minimum 3 years), technical support capabilities, and sample availability. Verify their manufacturing experience, check customer reviews, and ensure they offer consistent color temperatures and binning across batches for professional installations.

Supplier Evaluation Criteria
Selecting the right LED strip supplier impacts project success, long-term reliability, and total cost of ownership. Professional suppliers should demonstrate expertise through technical documentation, quality certifications, and responsive support.
Critical evaluation factors:
- Quality Certifications: ISO 9001, CE, UL, ETL, RoHS compliance
- Technical Specifications: Detailed datasheets with photometric data
- Warranty Coverage: Minimum 3-year warranty with clear terms
- Color Consistency: MacAdam ellipse ratings (SDCM <3)
- Sample Policy: Free or low-cost samples for testing
- Technical Support: Engineering assistance and installation guidance
- Inventory Depth: Stock availability for immediate needs
- Custom Capabilities: Ability to modify specifications
Xmart Lighting Pro Tip: After working with over 500 contractors globally, we’ve learned that suppliers who provide IES files, conduct LM-80 testing, and maintain less than 3-step MacAdam ellipse color consistency deliver projects with 90% fewer callbacks and warranty claims.
Connecting multiple LED strip lights successfully requires understanding proper wiring methods, power requirements, and quality connection techniques to ensure reliable, long-lasting installations.