LED strip lights have revolutionized modern lighting design, offering versatile illumination solutions that can transform any space from ordinary to extraordinary.
Whether you’re planning under-cabinet kitchen lighting, creating ambient bedroom atmospheres, or designing commercial displays, understanding the installation options for LED tape is crucial for achieving professional-grade results.
The question of hardwiring LED strip lights opens up possibilities for permanent, seamless installations that eliminate visible cords and create cleaner aesthetic finishes throughout residential and commercial applications.
Video Guide: This comprehensive tutorial demonstrates the complete process of hardwiring LED tape lights, including proper connection techniques and electrical safety considerations.
What is LED Strip Light?
LED strip lights are flexible circuit boards populated with surface-mounted light-emitting diodes (SMD LEDs) and other components that produce continuous linear illumination. These versatile lighting solutions, also known as LED tape or ribbon lights, typically come in 16.4-foot (5-meter) rolls with adhesive backing for easy installation on various surfaces.
Video Guide: Learn the fundamental concepts of wiring LED strips, including power requirements and basic connection methods.
Core Components and Construction
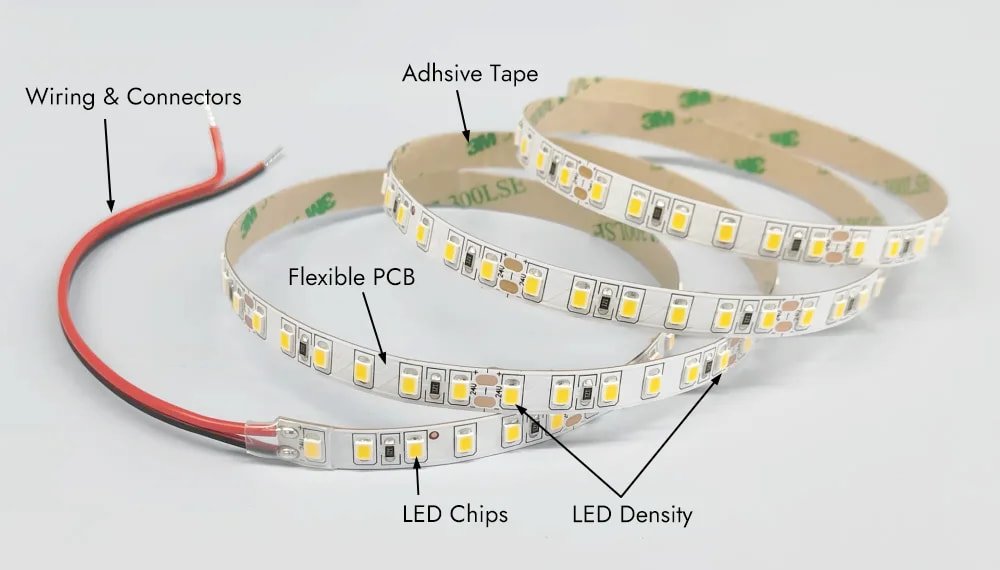
LED strip lights consist of several key elements working in harmony to deliver efficient illumination. The flexible PCB (Printed Circuit Board) serves as the foundation, hosting SMD LEDs spaced at regular intervals along with resistors and other electronic components.
Most strips feature 3M adhesive backing for tool-free mounting, while cutting marks every few inches allow customization to exact lengths.
Based on our internal data and market analysis, here is the breakdown:
| Component | Function | Common Specifications |
|---|---|---|
| SMD LEDs | Light emission | 2835, 3528, 5050, 5630 chips |
| PCB Width | Structural base | 5mm, 8mm, 10mm, 12mm options |
| Adhesive | Mounting solution | 3M VHB or standard tape |
| Copper Pads | Cut points | Every 1-3 inches typically |
| Resistors | Current regulation | SMD type, varies by voltage |
Xmart Lighting Pro Tip: When selecting LED strips, pay attention to the LED density (LEDs per meter) rather than just the total length. Higher density strips like 120 LEDs/meter provide smoother, more uniform light distribution compared to 30 or 60 LEDs/meter options, especially critical for task lighting applications.
How Does LED Strip Light Work?
LED strip lights operate by converting electrical energy into light through semiconductor technology, where current flows through the diodes causing electrons to release photons. The strips receive power through positive and negative terminals, with built-in resistors regulating current flow to each LED cluster, ensuring consistent brightness and preventing burnout across the entire length.
Video Guide: Discover the complete wiring process for LED strip lights, from power supply selection to final connections.
Electrical Operation Principles
The functionality of LED tape relies on carefully engineered electrical circuits that distribute power efficiently across multiple LED nodes. When voltage is applied to the input terminals, current flows through the copper traces embedded in the flexible PCB, reaching each LED cluster in parallel configuration. This parallel wiring ensures that if one LED fails, the remaining LEDs continue functioning normally.
The power consumption and heat generation characteristics vary based on several factors:
- Input Voltage Requirements: Most strips operate on 12V or 24V DC
- Current Draw Calculation: Typically 0.08-0.24 watts per LED
- Voltage Drop Compensation: Longer runs may require power injection
- Driver Selection: Constant voltage drivers maintain stable output
- Dimming Compatibility: PWM or analog dimming methods available
Xmart Lighting Pro Tip: For runs exceeding 16 feet, I always recommend using 24V strips instead of 12V to minimize voltage drop. The higher voltage means lower current for the same power output, resulting in less resistance loss through the copper traces and more consistent brightness from start to finish.
Can LED strip lights be hard wired?
Yes, LED strip lights can absolutely be hardwired directly into your home’s electrical system, providing a permanent and professional lighting solution.
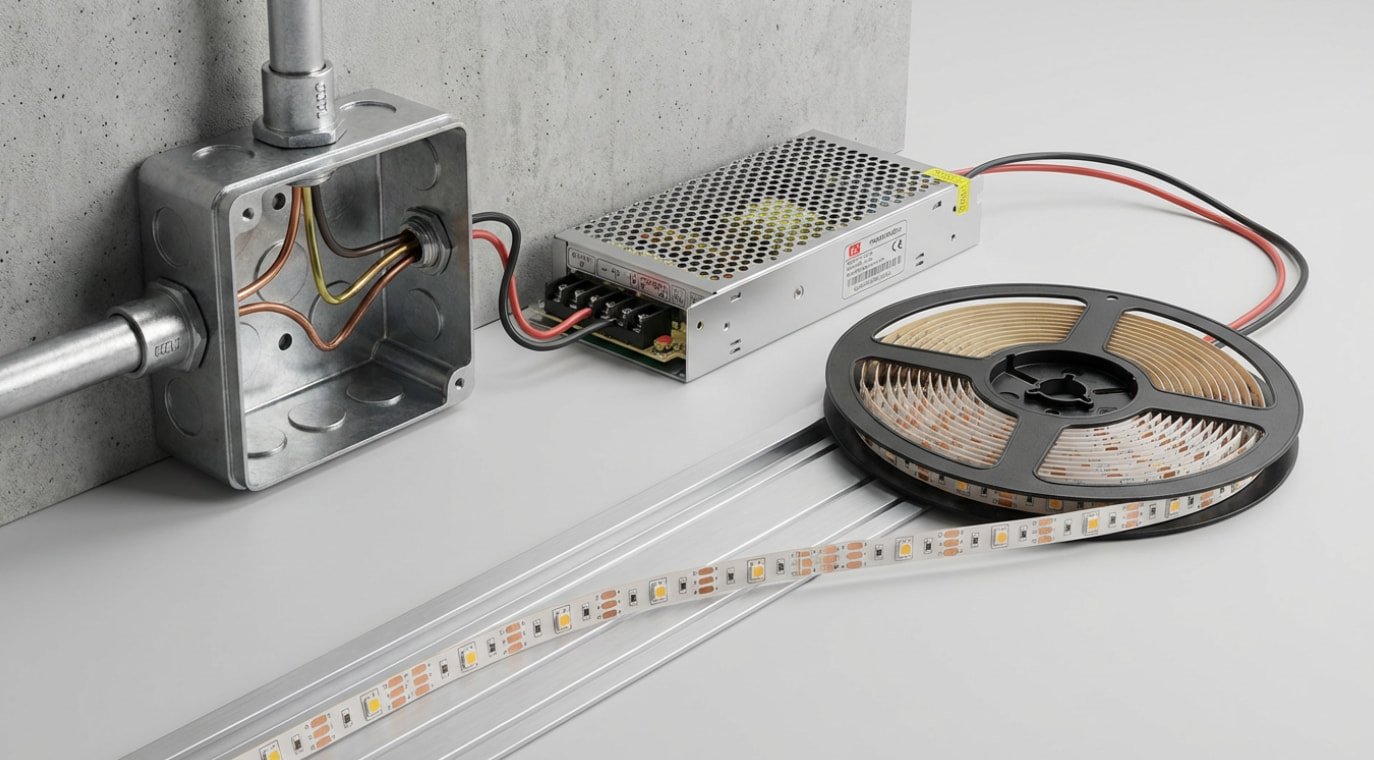
This installation method requires connecting the strips to a compatible LED driver or transformer that converts your home’s 120V AC power to the appropriate DC voltage (typically 12V or 24V) needed by the LED tape.
Video Guide: Follow along with a complete hardwired installation featuring dimmable controls and proper electrical connections.
Professional Hardwiring Methods
Hardwiring LED strips involves several critical components and safety considerations that differentiate it from plug-in installations. The process requires proper electrical knowledge and often benefits from professional installation to ensure code compliance and optimal performance.
Based on our internal data and market analysis, here is the breakdown:
| Installation Method | Required Components | Skill Level | Code Compliance |
|---|---|---|---|
| Direct Wire to Driver | LED driver, junction box, wire nuts | Intermediate | NEC Article 410 |
| Switch-Controlled | Driver, wall switch, electrical box | Advanced | Local permits required |
| Dimmer Integration | Dimmable driver, compatible dimmer | Professional | UL listing verification |
| Multi-Zone System | Zone controller, multiple drivers | Expert | Commercial grade specs |
| Emergency Circuit | Battery backup, transfer switch | Licensed only | Life safety codes |
Xmart Lighting Pro Tip: When hardwiring LED strips, always install the driver in an accessible location rather than hiding it completely behind walls. This makes troubleshooting and eventual replacement much easier – drivers typically last 50,000 hours while the LEDs themselves can exceed 100,000 hours, so you’ll likely replace the driver first.
Do LED lights affect circadian rhythm?
LED lights significantly impact circadian rhythm through their blue light wavelength content, which suppresses melatonin production and signals wakefulness to the brain. Modern LED strips with tunable white or RGB capabilities allow users to adjust color temperature throughout the day, shifting from energizing cool white (5000K+) during daytime to warm white (2700K) in evenings to support natural sleep-wake cycles.
Video Guide: See practical LED strip installation techniques that can be adapted for circadian-friendly lighting setups.
Biological Impact and Solutions
The relationship between LED lighting and human circadian rhythms represents a crucial consideration in modern lighting design. Blue light wavelengths between 450-480nm most strongly influence the circadian system by activating intrinsically photosensitive retinal ganglion cells (ipRGCs) that communicate directly with the brain’s master clock.
Research-backed strategies for circadian-friendly LED strip implementation include:
- Morning Hours (6 AM – 10 AM): Cool white 5000K-6500K to promote alertness
- Midday Period (10 AM – 3 PM): Maintain bright, neutral white 4000K-5000K
- Late Afternoon (3 PM – 6 PM): Transition to warm white 3000K-3500K
- Evening Hours (6 PM – 10 PM): Dim warm white 2700K or amber tones
- Night Time (10 PM+): Red or amber LEDs only, minimal brightness
Xmart Lighting Pro Tip: I’ve found that installing dual-channel LED strips – one warm white and one cool white channel – provides the most flexibility for circadian lighting. Use a programmable controller to automatically adjust the mix throughout the day, creating a natural light progression that supports your biological clock without manual intervention.
Are LED strip lights fire hazard if plugged in but not on?
LED strip lights pose minimal fire risk when plugged in but turned off, as quality strips consume negligible standby power and generate virtually no heat in the off state. However, fire hazards can arise from poor-quality strips with inadequate components, improper installation on flammable surfaces, or using incorrect power supplies that don’t match the strip’s voltage requirements.
Video Guide: Watch a professional demonstrate proper hardwired LED strip installation with emphasis on electrical safety and heat management.
Safety Standards and Risk Mitigation
Understanding the fire safety aspects of LED strip lights requires examining both the technology’s inherent characteristics and installation best practices.
Quality LED strips incorporate multiple safety features including current-limiting resistors, proper trace sizing, and flame-retardant materials that significantly reduce fire risk compared to traditional lighting.
Based on our internal data and market analysis, here is the breakdown:
| Risk Factor | Probability | Prevention Method | Safety Standard |
|---|---|---|---|
| Overheating from poor ventilation | Low | Install on metal/glass surfaces | UL 2108 compliance |
| Electrical short circuit | Very Low | Use proper gauge wiring | NEC Article 725 |
| Power supply failure | Minimal | Choose UL-listed drivers | UL 8750 certification |
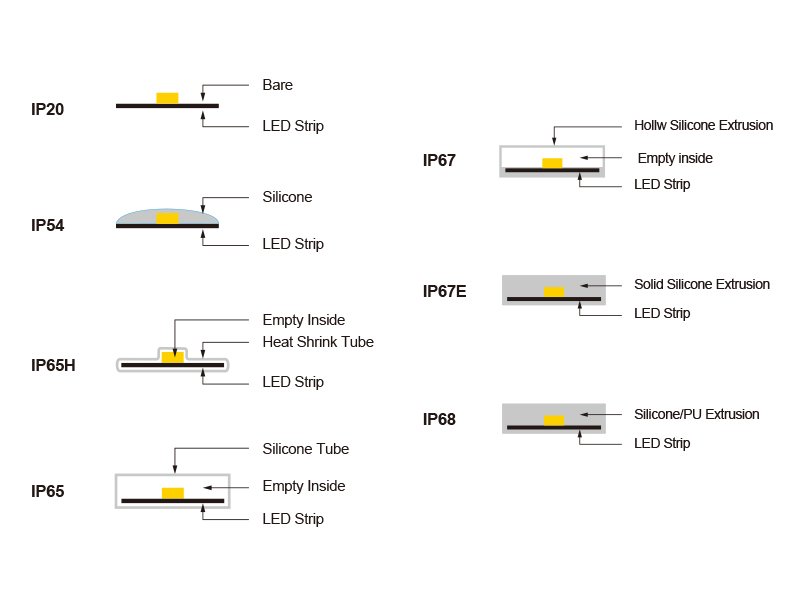
| Water damage (non-IP rated) | Moderate | Select appropriate IP rating | IP65+ for wet locations |
| Overloading circuits | Low | Calculate total wattage | 80% rule application |
Xmart Lighting Pro Tip: Even though LED strips are generally safe, I always recommend installing them on aluminum channels or heat sinks, especially for high-density strips. This not only extends the LED lifespan by improving heat dissipation but also adds an extra layer of fire protection – the aluminum acts as a barrier between the strip and any potentially flammable materials.
Key Features & Comparison
When selecting LED strip lights for hardwired installations, understanding the key specifications and how different options compare helps ensure optimal performance and longevity. The market offers various grades from basic residential strips to commercial-grade solutions with advanced features.
Based on our internal data and market analysis, here is the breakdown:
| Feature | Entry Level | Professional Grade | Xmart Lighting Premium |
|---|---|---|---|
| LED Density | 30-60 LEDs/m | 120 LEDs/m | 240 LEDs/m |
| CRI Rating | 80 | >8-90 | 95+ |
| Efficacy | 80 lm/W | 120 lm/W | 160 lm/W |
| Warranty | 1-2 years | 3-5 years | 7 years |
| IP Rating | IP20 (indoor) | IP65 (outdoor) | IP67 (submersible) |
| Color Options | Single white | Tunable white | RGBWW + Tunable |
| Dimming | Basic on/off | 0-10V dimming | RF/DMX/DALI/WiFi |
| Price Range | $0.6-0.8/meter | $1-1.2/meter | $1.2-1.5/meter |
The advanced features in premium LED strips justify the higher investment through superior light quality, extended lifespan, and enhanced control capabilities that create more sophisticated lighting environments.
Cost & Buying Factors

The total cost of hardwiring LED strip lights extends beyond the strips themselves to include drivers, controllers, installation materials, and potentially professional labor. Understanding the complete investment helps budget accurately and avoid unexpected expenses during your lighting project.
Initial Investment Breakdown:
- LED strips: $1-1.5 per meter depending on quality
- LED driver/transformer: $5-8 based on wattage
- Dimmer switch (if applicable): $8-10
- Aluminum channels: $1.2-2 per meter
- Wiring and electrical supplies: $1-1.5
- Professional installation: $200-500 per room
Long-term value considerations include:
- Energy Savings: 75% reduction versus incandescent
- Maintenance Costs: 50,000+ hour lifespan minimizes replacements
- Property Value: Permanent installations add home value
- Utility Rebates: Many regions offer LED upgrade incentives
- Quality Premium: Higher CRI and efficacy strips cost more upfront but deliver superior results
Xmart Lighting Pro Tip: Calculate your total wattage needs before purchasing the driver – add up all strip lengths, multiply by watts per meter, then add 20% headroom. A slightly oversized driver runs cooler and lasts longer than one operating at maximum capacity, making it worth the extra $10-20 investment.
Conclusion

Hardwiring LED strip lights represents a sophisticated lighting solution that combines the flexibility of LED tape with the permanence and professionalism of integrated electrical systems.
Through proper planning, quality component selection, and adherence to electrical codes, these installations deliver exceptional lighting performance while maintaining safety standards. Whether you’re upgrading kitchen task lighting, creating architectural accents, or designing commercial displays, hardwired LED strips from Xmart Lighting provide the versatility and reliability needed for stunning results.
The key to successful implementation lies in understanding your specific requirements – from voltage specifications and driver selection to circadian considerations and fire safety protocols. By following the guidelines and expert recommendations outlined above, you can confidently integrate LED strip lights into your electrical system, creating beautiful, functional illumination that enhances your space for years to come. Contact Xmart Lighting today to explore our professional-grade LED strip solutions and transform your lighting vision into reality.